|
RV Electrical Tutorial
Chapter 7 - Batteries and Chargers
Batteries are critical to an RV. They start the engine and provide power to run accessories when driving. When
parked they provide power to run lighting, water pumps, and various other accessories. They can even be used to power an
inverter to provide 120 volt AC power. Because of their heavy use they can sometimes be a source of aggravation and maintenance.
In this chapter we'll attempt to define what batteries are, how they work, and how to properly care for them. We'll also delve
into battery chargers and charging methods.
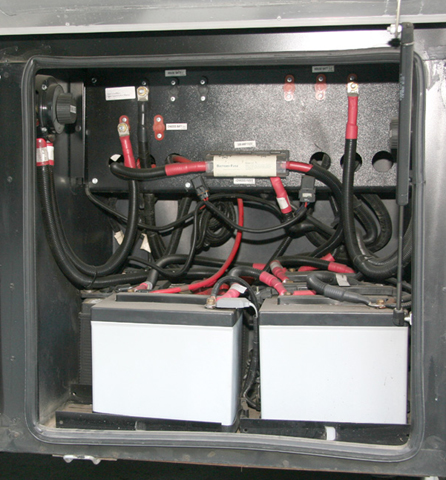
Typical Battery Bank
A single battery may be fine to operate your passenger car but it's just not enough power to handle the more
advanced requirement of an RV. To do this multiple batteries are arranged together into a battery bank. There are two
types of batteries and each type has a different intended use. Automotive batteries are what you have in your car. They
are designed to output a large burst of amperage to start the vehicle. Then, it slow gets recharged from the vehicle's alternator.
The key here is that they dump a lot of amperage in a short time, then rest for a while they slowly get recharged. Most
motorhomes will have two engine starting, or chassis batteries in order to crank these larger engines.
When camping, your coach electrical systems operate quite differently. They will draw less amps than a starter
motor but they will do that over a longer period of time. For this application deep cycle batteries are used. Deep cycle
batteries are designed for maximum performance by slowly draining amps from them and sustaining this draw over a longer period
of time. Most coaches will have four deep cycle batteries in a battery bank to ensure that there is enough capacity to supply
adequate power over a longer length of time. This can vary and some smaller coaches may only have two while some may have eight
batteries in a bank.
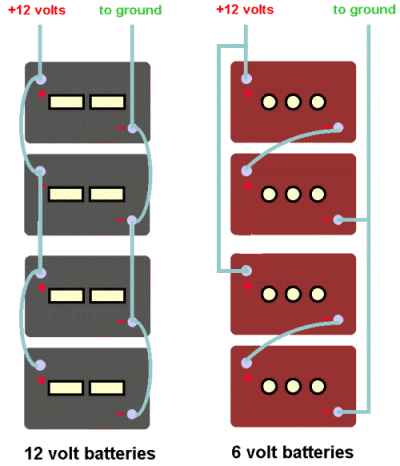
RV electrical systems are 12 volt systems. Whenever you connect multiple batteries together you have to make the
proper connections in order to maintain 12 volts. If batteries are connected in parallel they will retain their voltage but if
they are connected in series the voltages will add up. So, if you have a bunch of 12 volt batteries that you want to connect
into a battery bank you simply connect all the positive posts together and all of the negative posts together. But many RVs
are using 6 volt batteries for their deep cycle applications. 6 volt batteries are typically used in golf cart applications.
They have a heavier plate design and are more durable plus they output more power than a 12 volt battery of similar dimensions.
The only downside is that you need to connect them properly to get a 12 volt output. Basically you connect a pair of 6 volt
batteries together in series to give you a single 12 volt battery. Then you connect the positive posts of this pair together
with all of the other pairs and then do the same with the negatives. The following diagrams show a four battery bank of both
12 volt and 6 volt batteries and will help explain this better.
Connecting a Four Battery Bank
Battery Types:
Batteries come in different types. For RV applications the most common are flooded batteries or AGM
batteries. Flooded batteries are filled with electrolyte. This electrolyte is a diluted form of sulfuric acid. When a load is
placed on the battery the acid puts a charge on the lead plates and creates electricity. At this time some of the sulfur and oxygen
leaves the acid and forms a sulfate on the lead battery plates, leaving water as the remainder. If a battery is totally discharged
the battery plates will be coated with sulfate and the electrolyte will be water. That's why dead batteries can freeze in cold
temperatures but fully charged batteries will not freeze. When the battery is recharged the sulfate falls of the battery plates and
recombines with the water to change it back to acid again. If the battery is over charged, in other words excess voltage is applied
to it when it already is charged up, the water can boil out of the battery and acidic vapors leave via the vented battery caps.
This reduces the water level and if it gets below the battery plates it can harm the battery. It also tends to corrode the battery
connections because of the acidic vapors. Maintaining the proper water level is critical to good battery performance.
AGM batteries use electrolyte but not in a liquid form like flooded batteries. The acidic electrolyte is absorbed
into glass fiber mats that are wrapped around the lead battery plates. With AGM batteries there is no need to ever worry about adding
water because there is no water in them so maintenance is greatly reduced. The battery terminals also are not as susceptible to
corrosion as flooded batteries because there is no outgassing, or venting, of electrolyte vapors. The outgassing of flooded batteries
means they need to be in a vented compartment and clear of anything that could create a spark. AGM batteries can be located anywhere
because they truly are sealed. AGM batteries are typically used in aircraft and they can be used in any orientation, even upside
down, with no negative consequences. AGM batteries also offer greater performance over a comparable flooded battery because the
voltage drop curve is flatter. More on that in the next paragraph.
Battery Volts to State of Charge
Battery Charge Voltages:
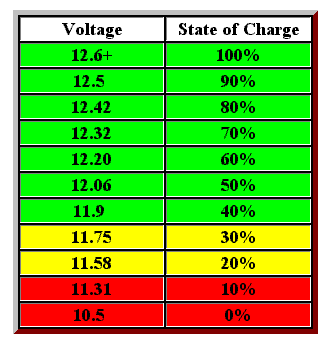
A fully charged battery will test out at 12.6 volts. This is at rest voltage. When a battery is being charged
the alternator or battery charger will put out higher voltage, sometimes as high as 14.5 volts. Immediately after stopping the engine
or switching off the battery charger the battery will have a false surface charge which is meaningless and probably in the
mid-13 volt range. Leave it sit for a while, maybe as low as 15 minutes or it might be as long as an hour or two, before testing.
This will allow the battery to rest and lose its surface charge. A slight load will help shorten that time somewhat. You can
continue to draw current from the battery until the at rest voltage drops below 11.9 volts. At that point only 40% of the battery
capacity remains. In other words you've used 60 amps from a 100 amp battery. If you continue to use the battery below this point you
can get current from it but the voltage will be low and that won't do your electrical equipment any favors. You will also drastically
shorten the battery's life.
Batteries are not really rated in years of life. A battery is typically rated at 50 cycles of discharge and recharge.
In other words you can totally discharge the battery, then recharge it. That's one cycle. Do that 50 times and the battery will be
shot. The level at which you discharge isn't linear, it's graded on a curve. So, if you only drain the battery halfway and then
recharge it you won't double your life to 100 cycles. It's more like 200 or more. Similarly, if you only drain your battery to 75%
you won't quadruple your battery's lifetime to 400 cycles. It's more like 1,200 cycles. So it is to your advantage to keep your battery
bank from getting too low by frequently recharging it.
If you were to plot battery voltage vertically on a graph against battery consumption horizontally on that graph you
would see that the voltage doesn't drop off in a straight line. It falls off on a curve, which drops fairly rapidly at the halfway
point. This helps explain why the old rule of thumb is to not discharge your batteries below 50%. So, a 220 amp-hr battery is safely
capable of giving up 110 amp-hrs without risking any damage to that battery. AGM batteries have less internal resistance than flooded
batteries. This means that they can take a charge faster than flooded batteries but it also means that their voltage drop graph will
be much flatter than a flooded battery. By the time you reach that 11.9 volt level you have given up many more amp-hrs than you would
with a flooded battery. Typically an AGM battery can give up 30% more amp-hrs that a flooded battery so in effect you can get 140 amp-hrs
from a 220 amp-hr battery instead of the 110 amp-hrs that you would be able to get from a flooded battery. In effect you are getting some
free battery amperage from an equal sized battery bank.
Battery Testing:
Battery testing tends to be confusing for some. Part of the reason is that there are three tests that one can perform on
batteries and not one of them will give you the total picture. You need to understand what these testing devices will do and how to
interpret that information. To do this we'll look at voltmeters, hydrometers, refractometers, and carbon pile testers.
|
|
|
|
|
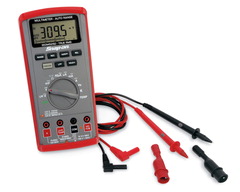
Voltmeter
|
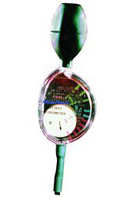
Hydrometer
|
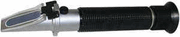
Refractometer
|
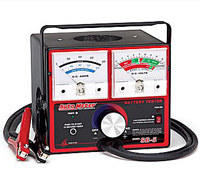
Carbon Pile Tester
|
The voltmeter is the first thing that anyone goes for. It'll tell you just how many volts the battery has in it. If
this is performed on a battery that has been resting we can use the above chart to determine if it is fully charged or not. However,
it's not the ultimate tool because it won't give you any indication as to the ability of the battery to deliver electricity. It could
just be a surface charge that will fall flat when a load is applied. If your battery has a bad cell the voltmeter won't give you an
accurate reading of how good your battery is. Remember that the electrolyte in each cell changes between acid and water, depending on
the charge level. To check each cell we need to take a sample of the battery fluid and test it for specific gravity, because acid is
heavier than water. If we use a hydrometer we can extract a sample of the electrolyte and test
its specific gravity. A fully charged
battery cell will have a specific gravity of 1.277 at 80° F. As the charge level decreases, so will the specific gravity. The
following table shows the various charge levels, at rest voltages, and specific gravity. By testing each cell we can test to see if
one bad cell is causing the battery to fail. If one cell is bad, then the battery will need to be replaced. An even better way to
test for specific gravity is to use a refractometer. You simply set a drop of fluid onto the refractometer, aim it at a source of light,
and look into the eyepiece. The display will show you exactly what the specific gravity is and is temperature compensated whereas the
when using a hydrometer you will need to apply temperature correction tables to the float reading. Refractometers also have another
benefit in that the same unit can also be used to test antifreeze protection levels.
|
Percentage
of Charge
|
Specific Gravity
Corrected to
80° F
|
At Rest
Voltage
|
|
100
|
1.277
|
12.73
|
|
90
|
1.258
|
12.62
|
|
80
|
1.238
|
12.50
|
|
70
|
1.217
|
12.37
|
|
60
|
1.195
|
12.24
|
|
50
|
1.172
|
12.10
|
|
40
|
1.148
|
11.96
|
|
30
|
1.124
|
11.81
|
|
20
|
1.098
|
11.66
|
|
10
|
1.073
|
11.51
|
All of the above serve to inform you of the battery's state of charge. It has no bearing whatsoever on the ability of
the battery to produce any volume of power. For this you will need to perform a load test and the best tool for that is a carbon pile
tester. Carbon pile tester consists of a carbon pile rheostat. AS you dial the knob in, it increases resistance and simulates a load
on the battery. It's bigger than a light bulb but smaller than a dead short so think of it as a controlled short that will suck power
from your battery. In addition the tester includes a voltmeter and ammeter. You simply connect the alligator clips to the battery
terminals and dial in the knob on the tester. As the load increases the display on the ammeter will indicate this. You dial it in
until the ammeter reads three times the rated battery current so a 100 amp-hr battery would get turned down to a 300 amp draw. You
then check the voltmeter to see if the voltage holds in the green zone. If it drops down into the red zone your battery is not capable
of sustaining that output level and will need to be replaced. At the same time you can inspect the battery cells to check for any
boiling or bad cells if you want to know why your battery failed. Voltmeters and hydrometers alone will not give you this information.
you need the variable load of the carbon pile tester to accurately test this.
Battery Care and Maintenance:
To ensure that your batteries perform their best and last the longest you will need to take care of them. Batteries
can't pass power to the electrical system if their connections are all corroded. The acidic electrolyte in flooded batteries tends to
eat away at the copper and lead connections and eventually corrosion will build up and hamper the flow of current. You will need to
check and clean these connections regularly as part of a scheduled maintenance cycle. Flooded batteries can lose water over time. It's
important to check your water levels so that they do not get so low as to expose the battery plates. Keeping the batteries away from
very hot locations will help in this but the biggest cause of battery water evaporation is due to overcharging. Putting excess voltage
into a battery that is nearly charged will boil the electrolyte and the battery will outgas. If you find that you are repeatedly adding
water to your batteries it's time to check your charger's float voltage.
Battery Chargers:
We all know how easy it is to take power out of a battery. What about recharging them when they are low? Batteries in a
motorhome can be charged in a number of ways, depending on the current mode of operation and whether they are chassis batteries or coach
batteries. First off we need to understand that there are two separate battery banks on a motorhome - the chassis batteries and the coach
batteries. The chassis batteries are for starting the motorhome's engine and powering the headlights, wipers, and other chassis related
accessories. When driving down the road the vehicles alternator will charge the chassis batteries. The "house" portion of the motorhome
has a separate bank of batteries called the coach batteries. These are deep cycle batteries that will power the lights, domestic water
pump, fans, and any other accessories that are related to living in the coach while parked. These batteries are kept separate from the
chassis batteries so, in the event that you run them down too low, you will still be able to start the motorhome's engine. A Charge
Solenoid is installed to connect both the chassis and battery banks together. This solenoid is engaged whenever the ignition key
switch is in the "on" position. The engine can then recharge both battery banks when driving down the road. As soon as you are parked the
solenoid opens and the two battery banks are divorced once again.
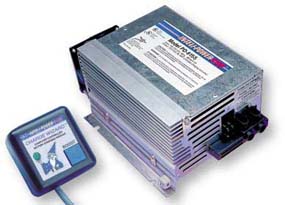
Typical Converter
|
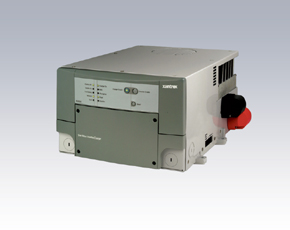
Typical Inverter/Charger
|
But, what about when we are parked at a campsite? We don't want to have to run the engine all the time to recharge these
batteries so we need other options. The first option is a battery charger that is dedicated to the coach's electrical system. This
charger is a 120 volt device that will be powered whenever we plug into shore power or run our generator set. In addition to charging the
batteries we also need to provide clean power with consistent voltage to power the 12 volt electrical components while we are parked
rather than use the batteries to power them. This device is called a converter. The converter is hard-wired into the 120 volt
electrical system as well as the 12 volt system. It "converts" 120 VAC power to 12 VDC power to run the 12 volt accessories as well as
charge the coach battery bank. So, now we have the ability to recharge the coach batteries via the engine alternator when driving or via
the converter when parked with shore power or when running the generator. When boondocking we can use the batteries to provide power and
when the voltage gets to that magic 50% mark we can fire up the generator set for an hour or two to power the converter and recharge the
batteries. The actual charge time will vary according to the size of the converter as well as the size of the battery bank. If the battery
bank is 440 amp-hrs and it is at 50% you'll need 220 amp-hrs to bring it to
its fully charged state. If you have a 60 amp converter
you'll be looking at close to 4 hours to output that much power. Larger converters take less time but cost more.
Another popular device is the inverter. An inverter does just the opposite of a converter. It creates 120 VAC power
from 12 VDC. It is used to power 120 volt devices via battery power so that you don't have to run the generator all the time. Small inverters
run from 250 watts up to 1,000 watts and are installed into an electrical circuit. No battery charging capabilities exist on a true inverter.
Most diesel pushers use an inverter/charger unit. These units combine the features from both an inverter and a converter. They are generally
found in larger sizes, such as 2,000 watt and 3,000 watt. These inverters are connected to a dedicated 120 volt circuit breaker in the main
breaker panel and also connect to the coach batteries via large diameter battery cables. They feature an automatic transfer switch that will
pass shore power through when present or switch over to battery fed inverter power whenever shore power is not present. Note that the running
the generator is the same thing as shore power in this instance. Whenever 120 VAC power is present the inverter not only passes that power
through to the electrical devices fed by it, but it also acts as a converter and provides 12 volt current to power the house accessories and
recharge the coach battery bank. Typical inverter/chargers have battery charging capacity in the 100 to 140 amp-hr range so they are larger
and faster than a converter. When an inverter/charger is present there is no need for a converter.
Both converters and inverter/chargers feature three battery charging modes. When a battery is low on charge the first mode is
the bulk mode. This mode provides full charging output to the batteries. As the battery approaches the full mark the charger will kick
into absorption mode. In this mode the voltage is regulated to not be excessive so that the batteries can absorb this charge without
boiling. Finally, in order to maintain a charge in a battery that is very close to full the float mode will be engaged. In this mode
charger output voltage will be limited to no more than 13.2 volts so that excess outgassing does not occur. You can safely leave your batteries
connected to the charger indefinitely if it's in float mode without fear of boiling out water. Of course, this assumes that your charger's float
mode is functioning properly. If you are adding water frequently it's time to have your charger's float voltage checked.
Equalizing Batteries:
We talked earlier about how battery electrolyte loses its acid content and turns to water and deposits sulfate on the battery
plates as it is discharged during normal operation. We also mentioned how this sulfate "falls off" the battery plates and recombines with the
electrolyte as the battery is recharged. But this process isn't perfect and some of the sulfate will remain on the battery plates. The more we
use the battery, the more sulfate remains on the plates. Each time that the sulfate remains on the plates we lose some battery capacity. If it
continues we have a sulfated battery that just isn't capable of giving us the performance that it was originally designed for. If we wait until
it's really serious the battery will need to be replaced. However it is possible to clean some of this sulfate off of the plates if we don't
wait until it's too far gone. This can be done by a process called equalization. When we equalize batteries we apply excessive voltage
to that battery, or battery bank. This excess voltage will boil the electrolyte and cook the sulfate off so that it can recombine with the
electrolyte, restoring both the electrolyte and battery plates to their original condition. This process isn't 100% perfect either, but it will
greatly extend your battery's life and improve its performance if done regularly. The time frame between equalizing batteries will vary as
to how you use your batteries. If you frequently run them low and recharge them you'll need to do this more frequently that if you are plugged
into shore power most of the time and don't demand those deep swings in charge level. If you use them hard, equalizing every 6 months would
be a good idea, otherwise once a year should be sufficient.
Equalizing requires a period of time where you will put high voltage into your battery bank. Most converters and inverter/chargers
have the ability to perform an equalizing procedure on your batteries. Refer to your owner's manuals for the exact technique used to initiate
an equalizing charge with your particular charger. When equalizing the charger will output around 15.5 volts. This is too much for your coach's
electrical devices to handle so it's important to disconnect any loads in the coach during this time. Operating the battery disconnect solenoid
switch will kill most power to the coach but there may be a few devices that are connected directly to the batteries and are not run through
the disconnect solenoid. Check for these and pull fuses or whatever else it takes to disconnect them. Note that it is not necessary to disconnect
the chassis system because you will only be equalizing the coach batteries. Chassis batteries do not require equalizing because they are not deep
cycle batteries or subject to those conditions. Also, equalizing is only to be done on flooded batteries. If you have AGM batteries equalizing
is not needed, nor should it ever be performed on AGMs or they will be damaged by the equalization process.
In the next section we'll talk about some battery powered circuits and devices.
Index
|
